Visual Studio Code で TypeScript 環境を設定してデバッグ実行する
このページは、Visual Studio Code で TypeScript 環境を設定し、デバッグ実行するまでの手順を説明するページです。
注意
- コンソール (ターミナル) で起動するプログラムを想定した手順です。(ブラウザで実行する想定のものではありません)
前提
この手順で前提としているライブラリ等のバージョンは下記のとおりです。
| ライブラリ等 | バージョン |
|---|---|
| Visual Studio Code | 1.33.1 |
| node.js | v10.13.0 / v12.0.0 |
| typescript | 3.4.3 |
手順
node.js のインストール (インストールしていない場合)
node.js をインストールしていなければインストールします。
TypeScript のインストール (インストールしていない場合)
TypeScript をインストールしていなければ、npm install -g typescript コマンドを実行してインストールします。
package.json の準備 (npm init -y)
- Visual Studio Code のメニュー 「ファイル」 > 「フォルダーを開く」などから作業したいフォルダを指定して Visual Studio Code 上で開きます。
npm init -yコマンドを実行します。(下記のような内容のpackage.jsonが生成されます。必要な場合は、あとでpackage.jsonを直接編集できます)
{
  "name": "test",
  "version": "1.0.0",
  "description": "",
  "main": "index.js",
  "scripts": {
    "test": "echo \"Error: no test specified\" && exit 1"
  },
  "keywords": [],
  "author": "",
  "license": "ISC"
}
tsconfig.json の準備 (tsc --init)
tsc --init コマンドを実行します。(下記のような内容の tsconfig.json ファイルが生成されます。必要な場合は内容を変更します)
{
  "compilerOptions": {
    /* Basic Options */
    "target": "es5",                          /* Specify ECMAScript target version: 'ES3' (default), 'ES5', 'ES2015', 'ES2016', 'ES2017', 'ES2018', 'ES2019' or 'ESNEXT'. */
    "module": "commonjs",                     /* Specify module code generation: 'none', 'commonjs', 'amd', 'system', 'umd', 'es2015', or 'ESNext'. */
    // "lib": [],                             /* Specify library files to be included in the compilation. */
    // "allowJs": true,                       /* Allow javascript files to be compiled. */
    // "checkJs": true,                       /* Report errors in .js files. */
    // "jsx": "preserve",                     /* Specify JSX code generation: 'preserve', 'react-native', or 'react'. */
    // "declaration": true,                   /* Generates corresponding '.d.ts' file. */
    // "declarationMap": true,                /* Generates a sourcemap for each corresponding '.d.ts' file. */
    // "sourceMap": true,                     /* Generates corresponding '.map' file. */

    // ... 略 ...

  }
}
tsconfig.json の内容のうち、"sourceMap": true のコメント (//) を外して有効にします。
{
  "compilerOptions": {
    /* Basic Options */
    "target": "es5",                          /* Specify ECMAScript target version: 'ES3' (default), 'ES5', 'ES2015', 'ES2016', 'ES2017', 'ES2018', 'ES2019' or 'ESNEXT'. */
    "module": "commonjs",                     /* Specify module code generation: 'none', 'commonjs', 'amd', 'system', 'umd', 'es2015', or 'ESNext'. */
    // "lib": [],                             /* Specify library files to be included in the compilation. */
    // "allowJs": true,                       /* Allow javascript files to be compiled. */
    // "checkJs": true,                       /* Report errors in .js files. */
    // "jsx": "preserve",                     /* Specify JSX code generation: 'preserve', 'react-native', or 'react'. */
    // "declaration": true,                   /* Generates corresponding '.d.ts' file. */
    // "declarationMap": true,                /* Generates a sourcemap for each corresponding '.d.ts' file. */
    "sourceMap": true,                     /* Generates corresponding '.map' file. */

    // ... 略 ...

  }
}
ビルドタスクの設定 (tasks.json)
Visual Studio Code のメニュー 「ターミナル」 > 「既定のビルドタスクの構成」を選択後、「tsc: ビルド - tsconfig.json」 を選択します。(下記のような内容の tasks.json ファイルが生成されます。必要な場合は内容を変更します)
{
    "tasks": [
        {
            "type": "typescript",
            "tsconfig": "tsconfig.json",
            "problemMatcher": [
                "$tsc"
            ],
            "group": {
                "kind": "build",
                "isDefault": true
            }
        }
    ]
}
tasks.json に追加された設定にラベルを追加します。 ("label": "build" 等)
{
    "tasks": [
        {
            "label": "build", // 追加
            "type": "typescript",
            "tsconfig": "tsconfig.json",
            "problemMatcher": [
                "$tsc"
            ],
            "group": {
                "kind": "build",
                "isDefault": true
            }
        }
    ]
}
launch.json の preLaunchTask に設定するために使用します。公式や英語圏の説明では
launch.json の preLaunchTask は "preLaunchTask": "tsc: build - tsconfig.json" とする形になっているのですが、日本語化された Visual Studio Code では "preLaunchTask": "tsc: ビルド - tsconfig.json" としないと動作しないなど環境によって微妙な部分がありそうなため、上記のようにしています。"preLaunchTask": "tsc: ビルド - tsconfig.json" でよければこの「ビルドタスクの設定」で行う手順は不要です。
起動設定 (launch.json)
Visual Studio Code のメニュー 「デバッグ」 > 「構成の追加」を選択後、「Node.js」を選択します。 (下記のような内容の launch.json ファイルが生成されます)
{
    // IntelliSense を使用して利用可能な属性を学べます。
    // 既存の属性の説明をホバーして表示します。
    // 詳細情報は次を確認してください: https://go.microsoft.com/fwlink/?linkid=830387
    "version": "0.2.0",
    "configurations": [
        {
            "type": "node",
            "request": "launch",
            "name": "Launch Program",
            "program": "${workspaceFolder}\\index.js"
        }
    ]
}
launch.json に追加された設定にタスク設定を追加します。 ("preLaunchTask": "build" 等。"build" は tasks.json で設定したラベル名です)
{
    // IntelliSense を使用して利用可能な属性を学べます。
    // 既存の属性の説明をホバーして表示します。
    // 詳細情報は次を確認してください: https://go.microsoft.com/fwlink/?linkid=830387
    "version": "0.2.0",
    "configurations": [
        {
            "type": "node",
            "request": "launch",
            "name": "Launch Program",
            "program": "${workspaceFolder}\\index.js",
            "preLaunchTask": "build" // 追加。前行のカンマを忘れずに
        }
    ]
}
TypeScript ファイルの作成 (index.ts)
実行したいプログラムを作成します。
let message : string = "こんにちは!";
console.log(message);
デバッグ実行
Visual Studio Code のメニュー 「デバッグ」 > 「デバッグの開始」(F5) からデバッグ実行します。プログラムが動作すればOKです。また、ブレークポイントを設定して、ブレークポイントの位置で一時停止することも合わせて確認してください。
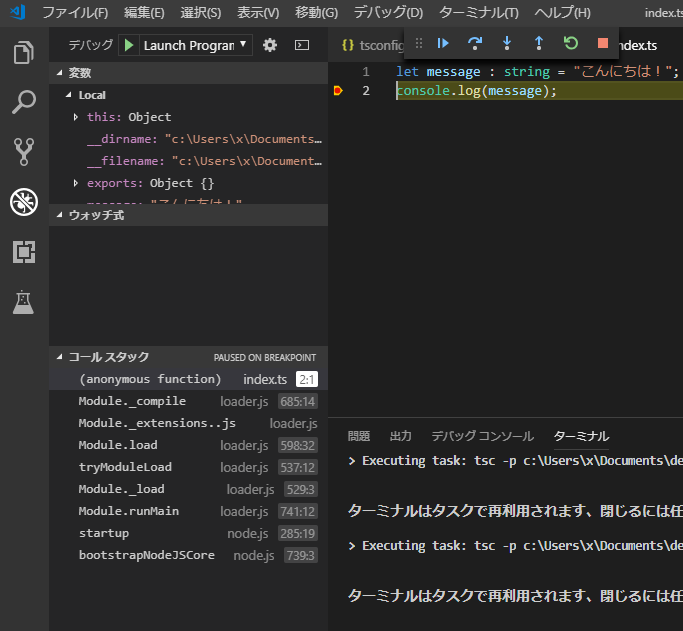
(ブレークポイントを設定してデバッグ実行したときのイメージ)
問題なく動作していれば設定は完了です。
最終的なフォルダ構成は下記のようになります。
プロジェクトフォルダ
│  index.ts (自分で作成した TypeScript ファイル)
│  index.js (デバッグ実行で出力された index.ts)
│  package.json (npm init -y で生成)
│  tsconfig.json (tsc --init で生成)
│
└─.vscode
        launch.json (「起動設定」で生成)
        tasks.json (「ビルドタスクの設定」で生成)
トランスパイラした .js ファイルの出力先フォルダを変更する
上記の手順だと、デバッグ実行したときに出力される .js ファイルが .ts ファイルと同じ位置に出力されます (.ts ファイルが増えてくると管理しづらくなってくる)。出力先フォルダを変更したい場合は下記のファイルを編集します。
tsconfig.json
outDir のコメントを外し、出力先フォルダを指定します。
{
  "compilerOptions": {

    // ... 略 ...

    "outDir": "./out/",                        /* Redirect output structure to the directory. */

    // ... 略 ...

  }
}
launch.json
program のパスにあるフォルダを出力先フォルダに変更します。
{
    // IntelliSense を使用して利用可能な属性を学べます。
    // 既存の属性の説明をホバーして表示します。
    // 詳細情報は次を確認してください: https://go.microsoft.com/fwlink/?linkid=830387
    "version": "0.2.0",
    "configurations": [
        {
            "type": "node",
            "request": "launch",
            "name": "Launch Program",
            "program": "${workspaceFolder}\\out\\index.js", // フォルダを変更
            "preLaunchTask": "build"
        }
    ]
}